Easy Simple Block Column for Gate Driveway
Eugene is a trained engineer and self-taught home improvement enthusiast with almost 40 years of professional and DIY experience.
© Eugene Brennan
A Narrow Gate Entrance
My driveway entrance was only 8 feet (2.5 m) wide, and this was always a tight squeeze for cars driving in, especially from the same side of the street where they had to make a sharp turn inwards. Inevitably, people occasionally scratched their side wings or bumped the gates in the process. Wide trucks were definitely a no no, meaning that I had to ask a neighbour's permission to use their gate entrance if large items needed to be delivered. So I decided to demolish one gate pillar, 3 feet of the adjoining wall and build a new concrete one.
Why Build a Concrete Gate Pillar?
Firstly my theory is that it would be more resilient to getting bumped by a car or truck (obviously not a heavy impact!). I've seen a couple of examples of brick pillars (also called piers) that had to be rebuilt because the joints all got shifted on impact. Secondly a block pier would have needed a central RSJ to support the hinges for gates and also a bricklayer. My block laying experience is limited to building a fuel bunker once and I didn't want to experiment on something in a prominent location at the front of the house. This was an inexpensive method too, probably about £120 ($150) which covered all the materials and construction timber. Thirdly I have an old dashed wall with a semicircular capping. A decorative stone or brick pier wouldn't match it.

Narrow driveway entrance.
Google Street View
Disclaimer
This article is for informational purposes only. The information provided is to the best of my knowledge and provides tips and ideas for construction. Check that any work that you do satisfies building regulations/code before commencing.
Demolition
I needed to demolish the pier and decided to remove a 3' (1m approx) section of wall also to widen the entrance. A "Kango" type heavy duty demolition drill is the proper tool for doing this. These can of course be hired, but I was working on this project at my leisure, so I took the slower approach of using a cheap homestore brand SDS drill and chisel bits. These are the other tools I used:
- Sledge hammer
- Lump hammer (builders hammer)
- Steel wedges for splitting concrete
- Cold chisel and bolster
- Consaw or angle grinder with diamond disk for cutting wall sections.
Construction
The number of tools I used for construction on a project like this are too numerous to list, but these power tools are pretty much essential:
- Cordless drill for inserting lots of screws
- Angle grinder for cutting rebar
- Cement mixer for making concrete
- A circular saw speeds up cutting of timber lengths and plywood
You also need basic hand tools such as:
- Shovel and spade for digging and making concrete
- Carpenter's hammer for nailing
- Level for plumbing the shuttering
- Measuring tape
- Carpenter's square
What PPE Should I Wear When Doing DIY?
With COVID19 being constantly in the news these days, we hear about personal protection equipment (PPE) on an ongoing basis. PPE is also vital to protect your eyes, ears, lungs, feet and hands when doing DIY. The number of pieces of kit you wear depends on the chore. For demolition work, the main hazard is dust, flying concrete fragments, noise, abrasion and items falling on your toes. This is a list of typical PPE items:
Scroll to Continue
Read More From Dengarden
- Dust mask suitable for protection against concrete dust
- Safety glasses or visor to protect eyes and/or face from flying concrete fragments when chiselling
- Ear muffs or ear plugs to protect ears from noise when hammering or chiselling with a power drill
- Gloves to protect hands from cuts and abrasion
- Steel toe cap and steel insole boots to protect toes from falling objects or walking on sharp items.
- Helmet in case you fall or tools or debris hit you on the head.
- Hi-viz clothing if working in a location where you could be struck by a vehicle or machinery.
To protect the public, you need to use hoarding/panels/warning signs and cones so that any work you do cannot cause injury. Cover any excavations also with suitable material.
What's the Best Way of Demolishing Concrete?
I hadn't really done this before, although I helped once to knock down a wall and chimney. I had a good idea of what I was doing though having 40 years of DIY experience! Here's some tips:
- I reckoned it would be safer to work above the pier initially in case any large chunks split away and landed on my toes or legs. So I broke up the top section from a step ladder.
- You can nibble away brick size chunks with the drill and chisel bit, but the best way to break a large section of concrete, especially if it's not terribly strong is to fracture it along a line. Chisel in a line away from you across the top or vertical face and often this will fracture a whole section which can be broken up later into manageable sections for moving and disposal.
- Watch carefully for fracturing and stand to one side so that sections will fall parallel to you rather than towards you.
- If you have a steel wedge, you can chisel out slots, hammer in the wedge and hit with a sledge hammer to fracture the concrete. Again this works better if make several slots in a line to break off a whole section.
- You can use a sledge hammer as brute force to break weakened sections. Swing parallel and not towards you in case it misses its aim on the concrete and hits you in the knees or shins.
- If using a sledge hammer to knock wall sections, cut and separate the section you need to remove first with a consaw or angle grinder to avoid damaging the remaining section of wall.
Pier, pre-demolition. The nice fuchsia bush had to be removed, but luckily I had planted another one behind it years ago because I knew I would eventually be widening the entrance!
© Eugene Brennan

Top half of pier removed. Concrete was easy to split.
© Eugene Brennan

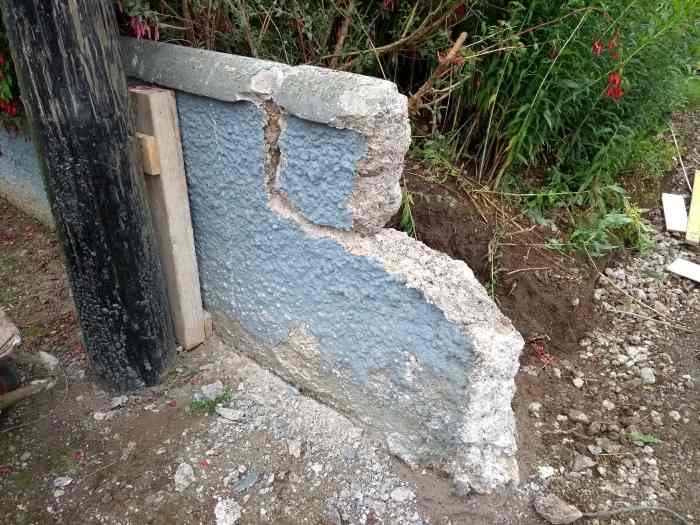
Some of this pier seems to have been made from waste blocks.
© Eugene Brennan
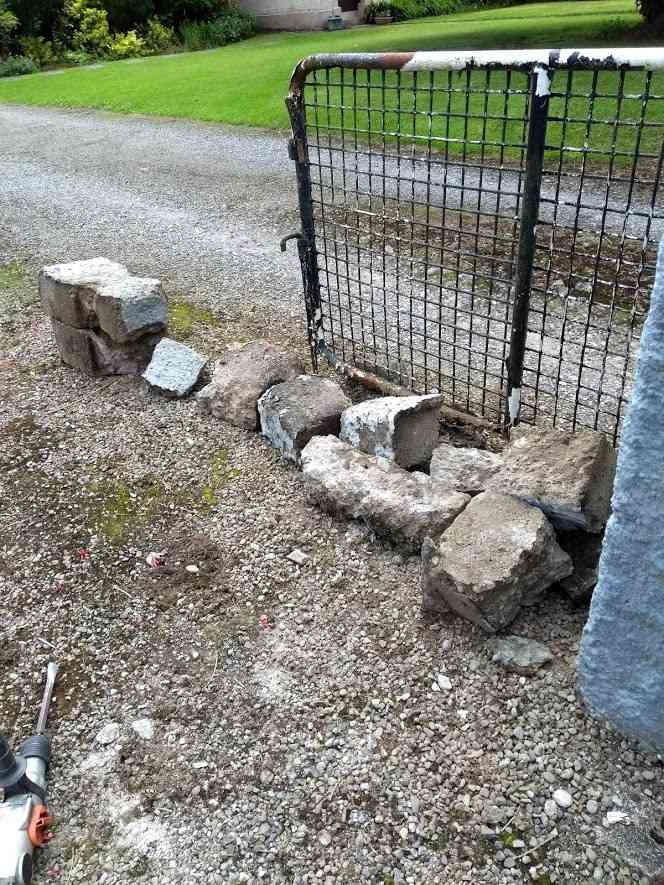
I broke the pier and wall into manageable chunks this size.
© Eugene Brennan
A 3 feet section of wall had to be demolished next.
© Eugene Brennan
Next, it was time to dig the foundations.
What is a foundation for?
Footings or a foundation for a pier, wall or building serve several functions:
- They spread the load. When you put a chair or a ladder on soft ground you may have noticed that the legs or stiles of the ladder sink dig into the ground. Placing a small board underneath the legs stops this happening. A foundation spreads load and reduces pressure so a structure doesn't sink (Snow shoes work on the same principle).
- A footing for a gate pier lowers the centre of gravity of the pier and acts as a counterbalance so that when gates are hung on the pier, it won't topple over.
What width and depth should the footings be?
Consult with building code or regulations for your country to see how wide footings should extend beyond a pier and how deep they should be. The width and depth depends on the nature of the ground, clay, rock etc and also the weight of the gates you intend to hang on the pier. Wider spread footings are suitable for softer ground, whereas deeper footings are suitable for rocky ground.
Width
My regulations specified the footings should be 400mm (16") wider in total than the wall or pier on non rocky ground. That's an extension of 200mm (8") each side. I decided my pier would be 18" square to match the other one, so to make things nice and even, I made my footing 36" wide in total, making it double the pier width (and extending 9" each side).
Depth
The regulations also specified that the thickness or depth of footings should not be less than the extension beyond the structure. Since the regulations specified a 200 mm extension each side, this made the depth 200mm which seemed quite shallow. I posted queries on several forums and the consensus seemed to be that 450mm (18") or 600mm was a typical depth that builders used when digging footings. Again this depends on the weight of gates and heavier gates need heavier foundations so they don't tip over. Also the depth of the hole is important because the ground itself provides a counter reaction (in engineering terms a counter moment) to restrain the pier. (Just like putting a post in a deep hole uses the ground to stop it falling over). Since my gates were going to be steel framed with bars and scrolls and not paneled hardwood, I estimated they would be less than 100kg (16 stone) each. I did some back of envelope calculations and worked out that the weight of pier and a 450 mm (18") depth of concrete would be well able to counterbalance these gates.
This was dug with spade and shovel, the clay extracted filling about 7 wheelbarrows. I tried to keep the sides vertical which was easy because I have a clayey soil. I made it of such a depth that the top of the footings would be about 150 mm (6") below ground level to allow for future tarmacking (blacktopping). In very cold regions, concrete footings should be deeper so they aren't damaged by penetrating frosts.
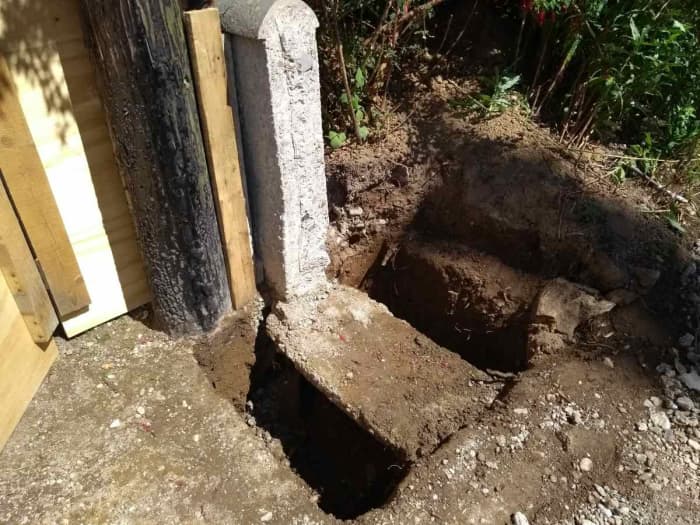
The existing wall foundation had to be removed first. I dug clay from under it, then just broke the two ends with the SDS drill.
© Eugene Brennan

© Eugene Brennan

Hole dug.
© Eugene Brennan
Adding a Sub Base
Once the hole was dug, I filled it with a 150mm (6") sub base of broken concrete. This may not be necessary, but it was a way of getting rid of some of the waste concrete and spreads load. Once in place, it was compacted with a heavy length of 4 x 6 to pack it.
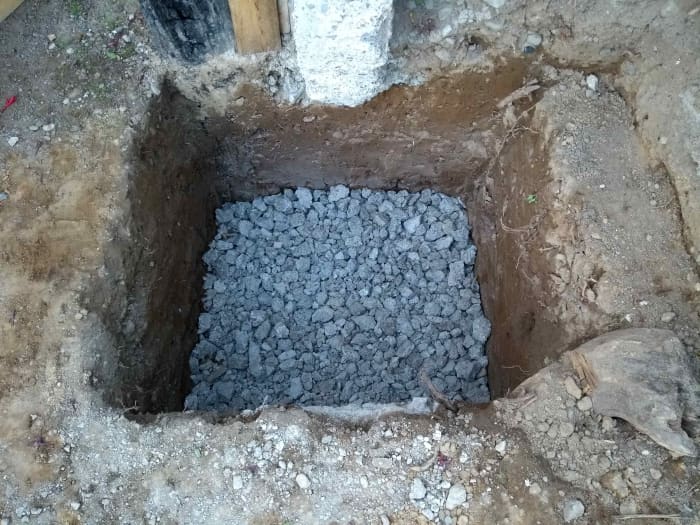
I broke up some of the concrete and used it as a sub-base.
© Eugene Brennan
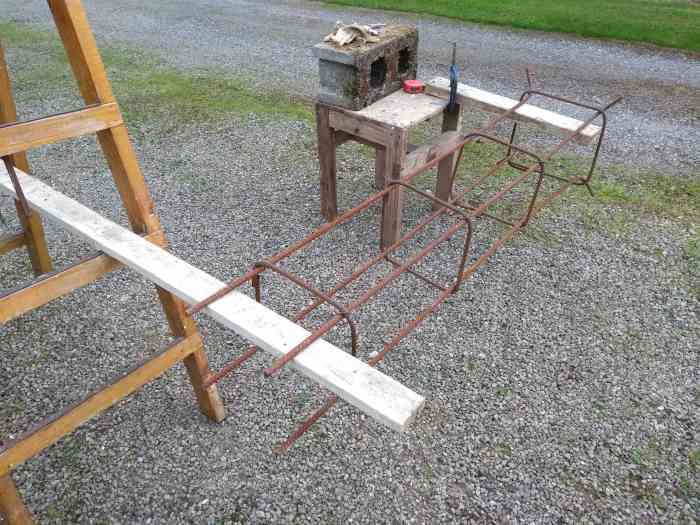
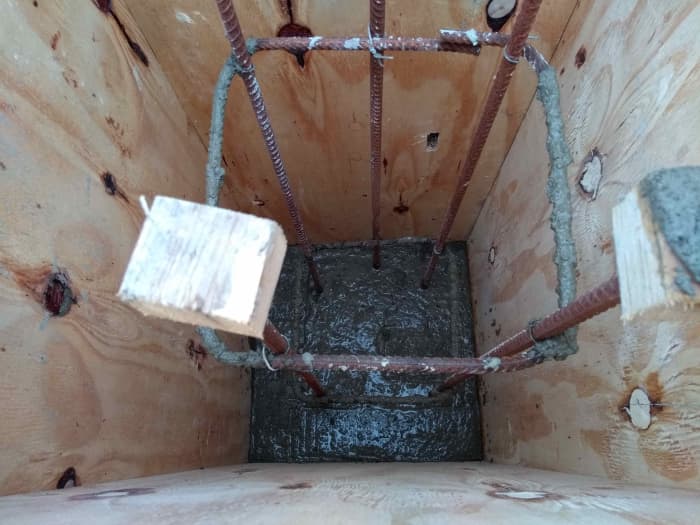
Using Rebar for Reinforcing Concrete
Concrete is only strong in compression, i.e. when squeezed. So it's used typically in construction for piers for supporting bridges and buildings. However concrete isn't as strong in tension and a long, unsupported horizontal concrete beam would snap suddenly under moderate load, whereas a timber beam of similar dimensions would bow as weight increases. To make it strong under both tension and compression forces, steel reinforcing bar or rebar is embedded. The steel is strong in tension, concrete is strong in compression and the resultant composite material is the best of both worlds.
Rebar should be kept 50 mm (2") in from the edge of concrete so that it doesn't get damp and corrode. For this construction, I used 12 mm (1/2") rebar.
Making the Vertical Rebar Insert
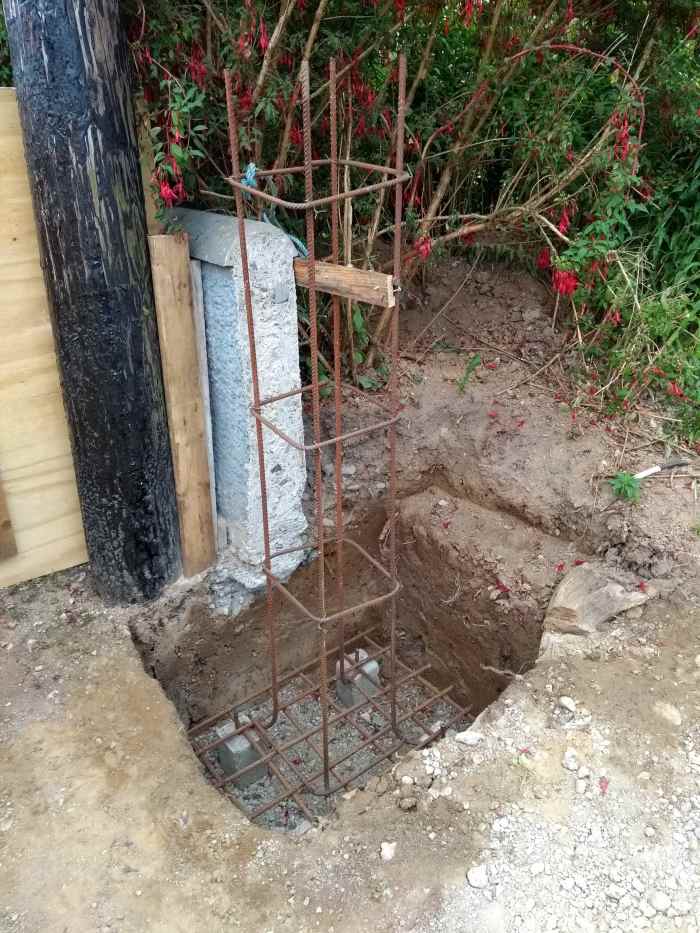
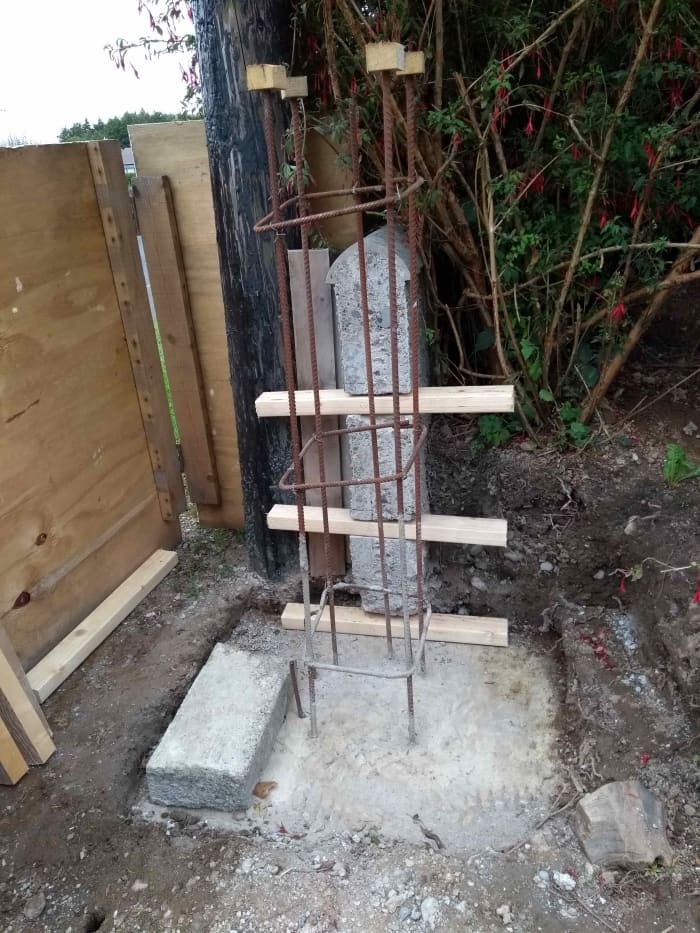
I built a "tower" consisting of 4 rebar rods with square rings to hold these pieces together. This tower would tie the pier to the footing and also hold the pier together if e.g. the concrete cracked.

Bending the square rings or stirrups. These hold the 4 vertical bars together.
© Eugene Brennan

Square ring or "stirrup" made from rebar.
© Eugene Brennan
Making the rebar frame for inside the pier.
© Eugene Brennan
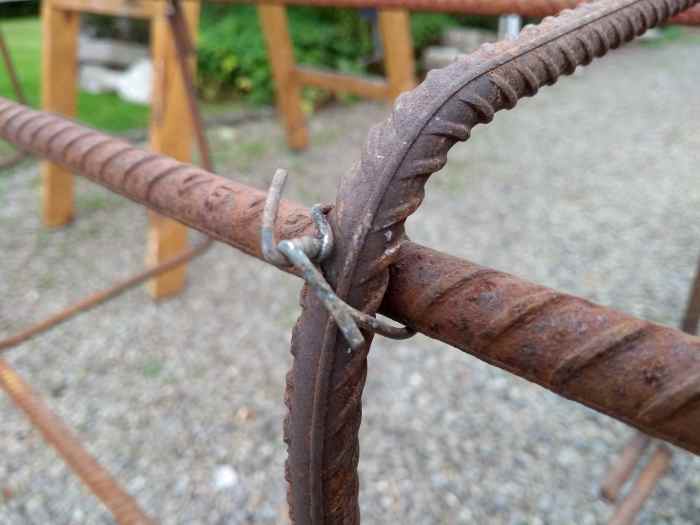
Sections of rebar are held together by steel wire, twisted together with a pliers.
© Eugene Brennan
Making the Grid
I made a grid from lengths of rebar and positioned it 1/3 of the way up from the bottom. This would prevent the bottom from "dishing" out like a saucer as the pier weighed down on it from above. I spaced the bars in the grid about 150 mm (6") and this was probably over engineered. 9" or 1 foot spacing was probably sufficient. I didn't place any grid in the upper section of concrete, but this would help prevent the top from breaking if driven on by a heavy truck. This is typically placed 1/3 of the way down from the top.
Positioning the grid in the hole
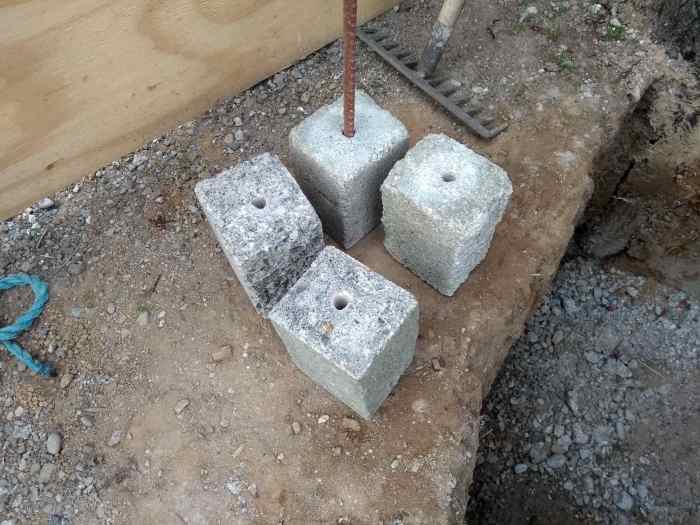
I used pieces of waste "soapbar" blocks as spacers to keep the grid in position. You can also buy plastic "castle" spacers in a store. Rebar hammered down through the spacers kept them fixed firmly and the pieces of rebar projecting from the top stopped the grid from moving during concreting (they fit tight into the corners of the squares). The edges of the grid were the required 50 mm (2") in from the edge of the hole to so it would be embedded in concrete and not rust.

I drilled holes in the block pieces with a masonry drill.
© Eugene Brennan

© Eugene Brennan
© Eugene Brennan
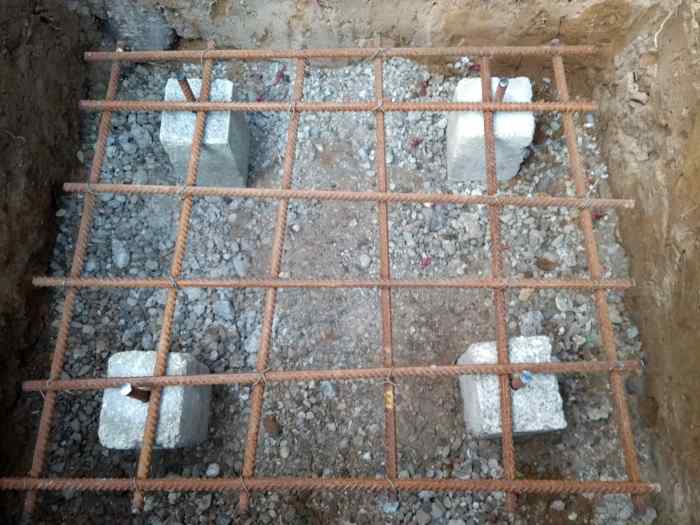
Grid in position.
© Eugene Brennan
Attaching the Vertical Section of Rebar
The 4 ends of the rebar were pre-bent about 100 mm (4") so I could attach them to the grid using steel wire. I adjusted the position carefully so that the steel would be centered in the pier.

Rebar "tower" attached to grid.
© Eugene Brennan
© Eugene Brennan
Mixing and Pouring the Concrete
It took about 7 mixes (equivalent to 7 wheel barrows) using a Belle Minimix mixer to fill the hole. I couldn't get consensus when asking on DIY forums about the recommended mix for footings. C30 is a strong mix used for pavements and was mentioned. This consists of 1 part cement, 3 parts stone and 2 parts sand or alternatively 1 part cement and 5 parts ballast (mixed aggregate). I had quite a lot of mixed aggregate, but it didn't have a large amount of stone content, so not wanting to add too much more sand, I mixed 1 part cement to 3 parts aggregate and 1 part sand. Once the footings were in place, I allowed about 2 weeks before I started working on the shuttering for the pier.
Checkout my guides here on how to mix concrete by hand or with a cement mixer:
Easy Steps to Mixing Concrete With a Cement Mixer
8 Steps to Mixing Concrete by Hand Without a Cement Mixer

Concrete footings complete.
© Eugene Brennan
Building the Formwork (Shuttering) for the Gate Pier
The formwork was built from 20 mm (3/4") shutter ply. You don't need to use marine plywood or anything fancy, however the more expensive stuff may give a smoother finish on concrete. Four sheets were used to make the box, screwed at the edges with 50 mm (2") screws spaced at 150 mm (6") intervals. Next timber rings built from 2 x 3 were made to encircle the box. These were held together at the corners by 4, 75 mm (3") round wire nails. A carpenters square was used to make sure the corners were at 90 degrees and the rings were not skewed. The rings held the mould together and stopped it from bulging or bursting. I also used heavy duty ratchet straps on the lower section as added insurance.
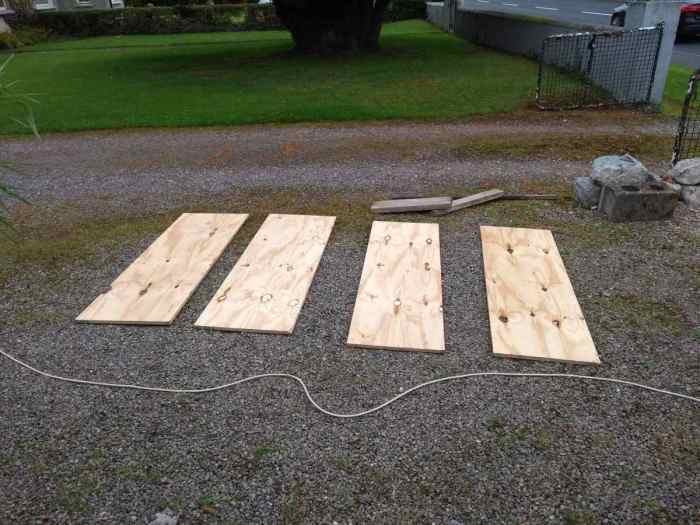
Side panels for the formwork box.
© Eugene Brennan
Parts of the timber rings in position. Note the pieces of wood pushed down onto the top ends of the of the rebar. It's easy to get an eye injury from bars or garden canes sticking up from the ground.
© Eugene Brennan
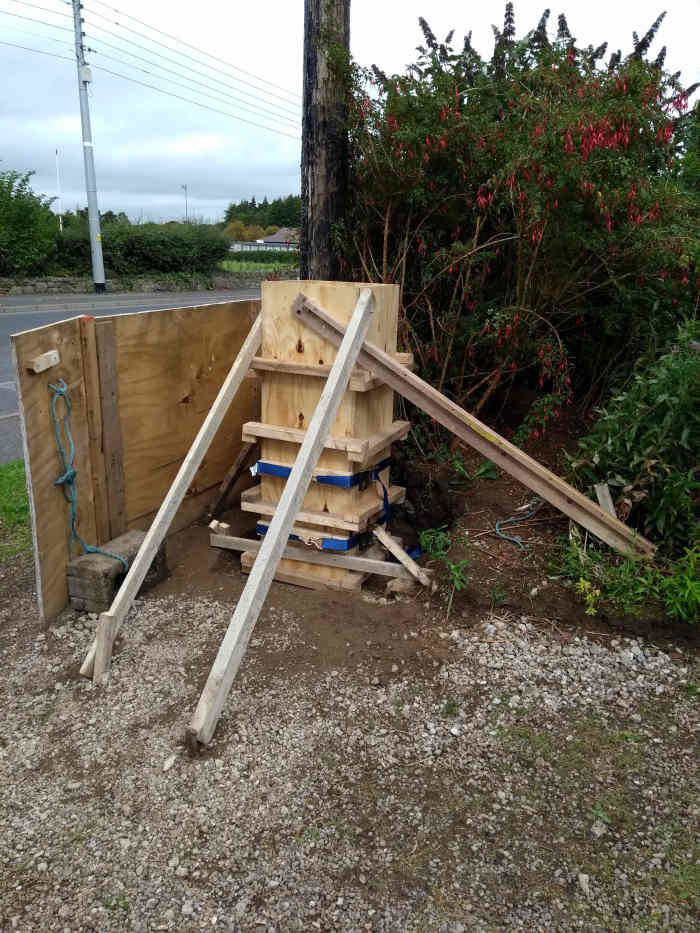
Formwork in place and stayed to keep it in place.
© Eugene Brennan
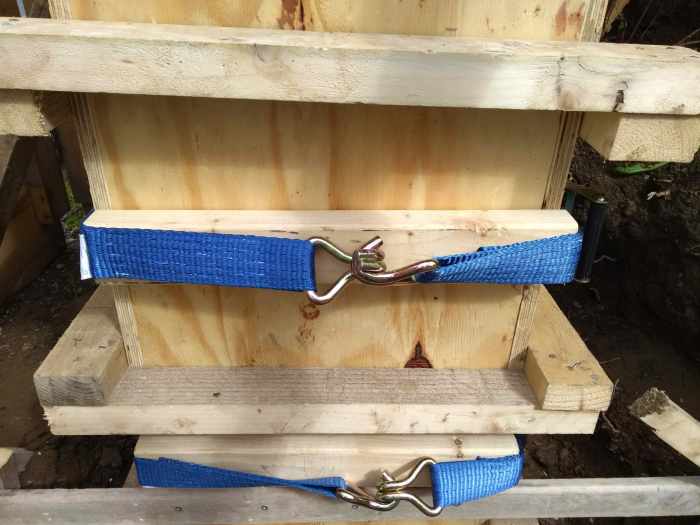
Ratchet straps add additional restraint.
© Eugene Brennan
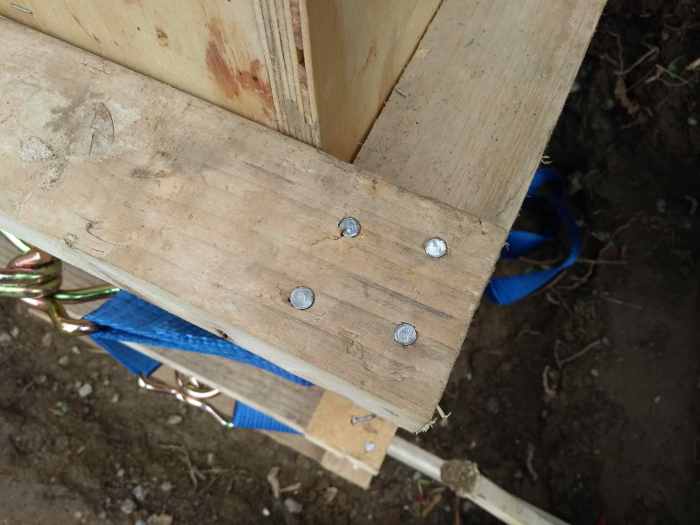
4 nails on each corner hold the 2 x 3s together.
© Eugene Brennan
Pressure of Concrete in Shuttering
Concrete has a density about 2 1/2 times that of water. If concrete was poured straight into a timber mould from a bottle tanker, it could easily rupture the casing because of the pressure. Pressure of a fluid increases with depth and its density. At the bottom of shuttering for an almost 5 foot tall pier like this one, it works out that on an 18" square of ply (the width of the pier), there is a pressure of nearly 600kg or 1320 lbs. That's if concrete is liquid. However it's not, it's a sludge and by pouring in sections and spreading the pour over hours, concrete at the bottom stiffens up, becoming semi-solid and lessening the pressure from the weight above.
Pouring the Concrete for the Pier
This was the most critical operation.
- Keep your shutter ply dry if rain is imminent. It can easily warp and buckle and destroy the finish on your concrete.
- Concrete shouldn't be sloppy and there should be minimal excess water. It should be able to self support itself on a shovel without slumping.
- Even with a slow pour, the timber rings are essential to hold the mould together and stop it from bursting with the pressure. I held the lower section together with ratchet straps as belt and braces.
- It took between 30 minutes to measure out the materials for the concrete, mix it, transport it to the mould and bucket it in. Then I waited about 15 minutes before starting the new mix. This spread the fill over about 5 hours.
- After each fill, I tamped down the concrete using a length of 1 1/2 by 2 with a board nailed on at the end. I had to make sure it was well tamped into corners as this is where it doesn't flow naturally.
- I used a length of rebar to "rod" the concrete after each pour, pushing it up and down to settle it within the shuttering and get rid of voids which could potentially weaken it. For a good finish on the surface, I rodded it well all around the perimeter. A vibrating poker power tool is available for doing this work.
- Once concrete was poured, I screeded off the top surface, tamped it down and waited for water to disappear from the top surface. Then I floated it for a smooth finish. The last step isn't really necessary if you're adding a capping.
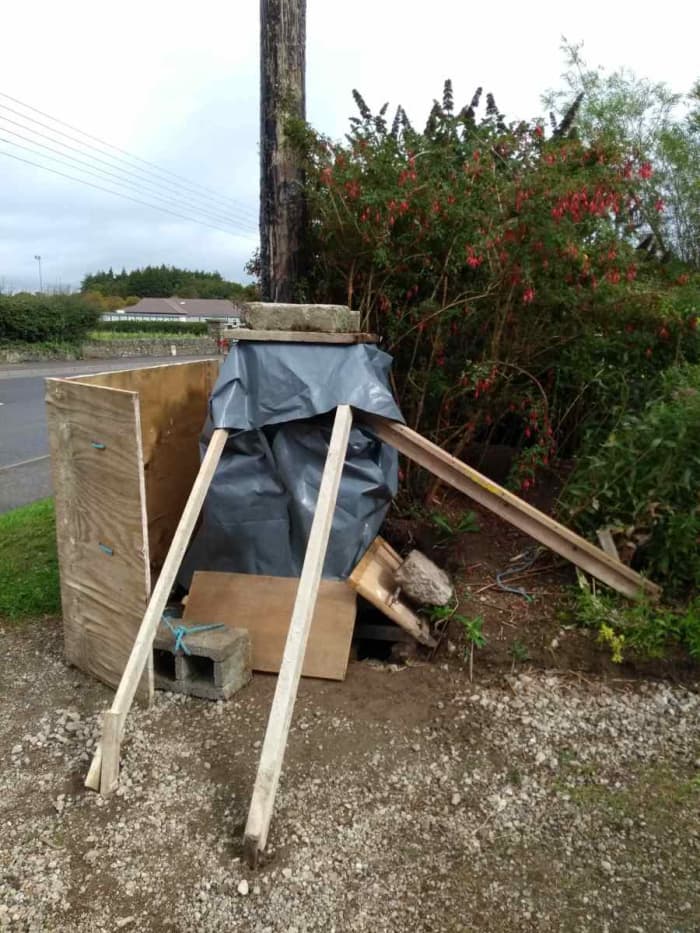
Weather was wet before I started casting, so I had to cover the mould to prevent warping and going out of shape.
© Eugene Brennan

Starting to pour concrete.
© Eugene Brennan
When concrete is poured, tamp it down and into the corners. Then rod it with a length of rebar to remove voids.
© Eugene Brennan

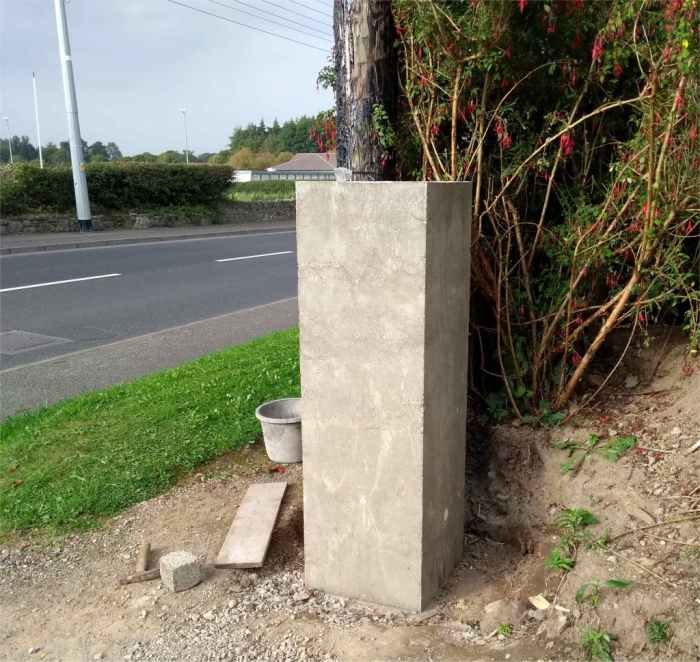
Finished concrete.
© Eugene Brennan
Removing the Shuttering
After a couple of days, I removed the timber stays. After 8 days I removed the shuttering. The plywood came of cleanly and the result was better than expected, so plastering wasn't necessary. Superficial chips and holes can be filled with a cement and sealant mix.

Supports removed after a couple of days.
© Eugene Brennan

Completed pier.
© Eugene Brennan
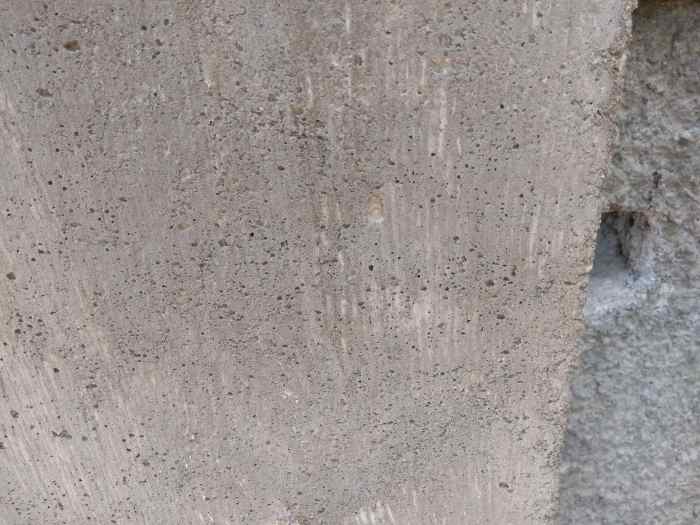
Concrete finish was reasonably good. A cement sealant mix could fill the holes.
© Eugene Brennan
Do I Need to Use a Mould Releasing Agent?
I didn't and plywood came of cleanly without effort. However from reading discussions on building forums, this doesn't always happen. You can buy a proprietary product or use vegetable oil and paint it onto the ply. This can however leave bubbles on the concrete.
Did I Over Engineer This?
Probably. From calculations, the pier should counterbalance a 700 pound, 5 1/2 foot gate, even without support from the ground surrounding the footing. My pier is 5 feet tall, so if the gate is about that height, it's unlikely to be that heavy, even if made from hardwood or steel.
Adding a Capping
This pillar is rather plain and functional. The next project is to build a mould and make a capping. I'll be writing a "how to" guide about this, later in 2021.
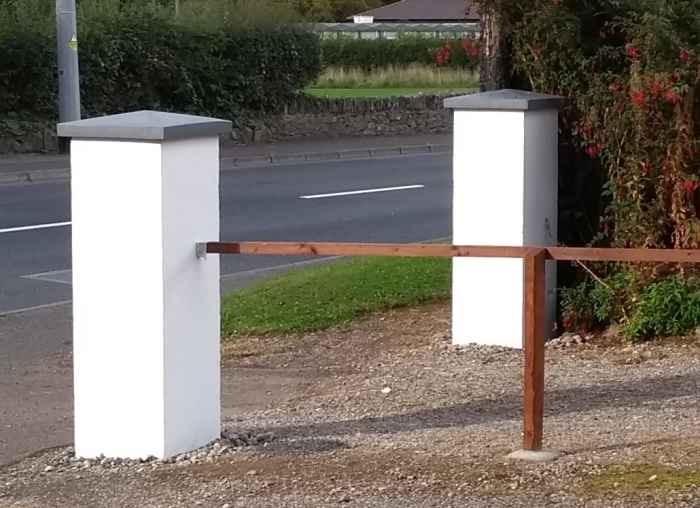
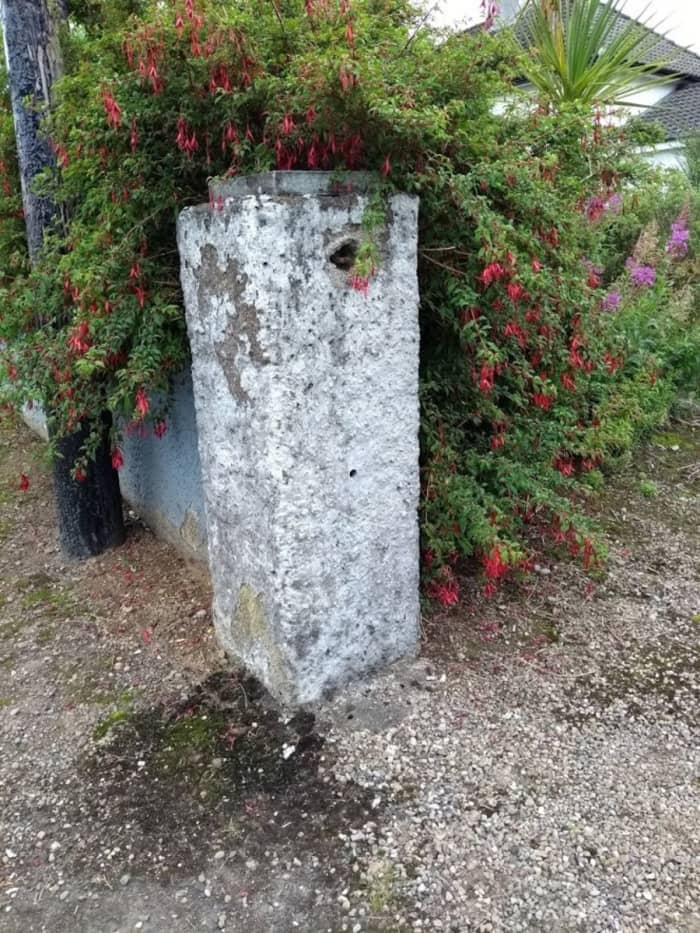
A year later, a second pier built and both painted.
© Eugene Brennan
References
Basham, Kim. PhD PE FACI (2010) Avoid Too Much Pressure When Placing Concrete ForConstructionPros.com
Calculation of Loads and Pressures on Concrete Formwork CivilEngineeringForum.me
This article is accurate and true to the best of the author's knowledge. Content is for informational or entertainment purposes only and does not substitute for personal counsel or professional advice in business, financial, legal, or technical matters.
© 2020 Eugene Brennan
Source: https://dengarden.com/home-improvement/How-to-Build-a-Solid-Concrete-Gate-Pier
0 Response to "Easy Simple Block Column for Gate Driveway"
Publicar un comentario